PMCHY

PMCHY
The Dragging Equipment Detector at State Line, KY

Wednesday, April 20, 2022

Construction Update #44 - Scenery around Monteagle & the Chip Processing Plant

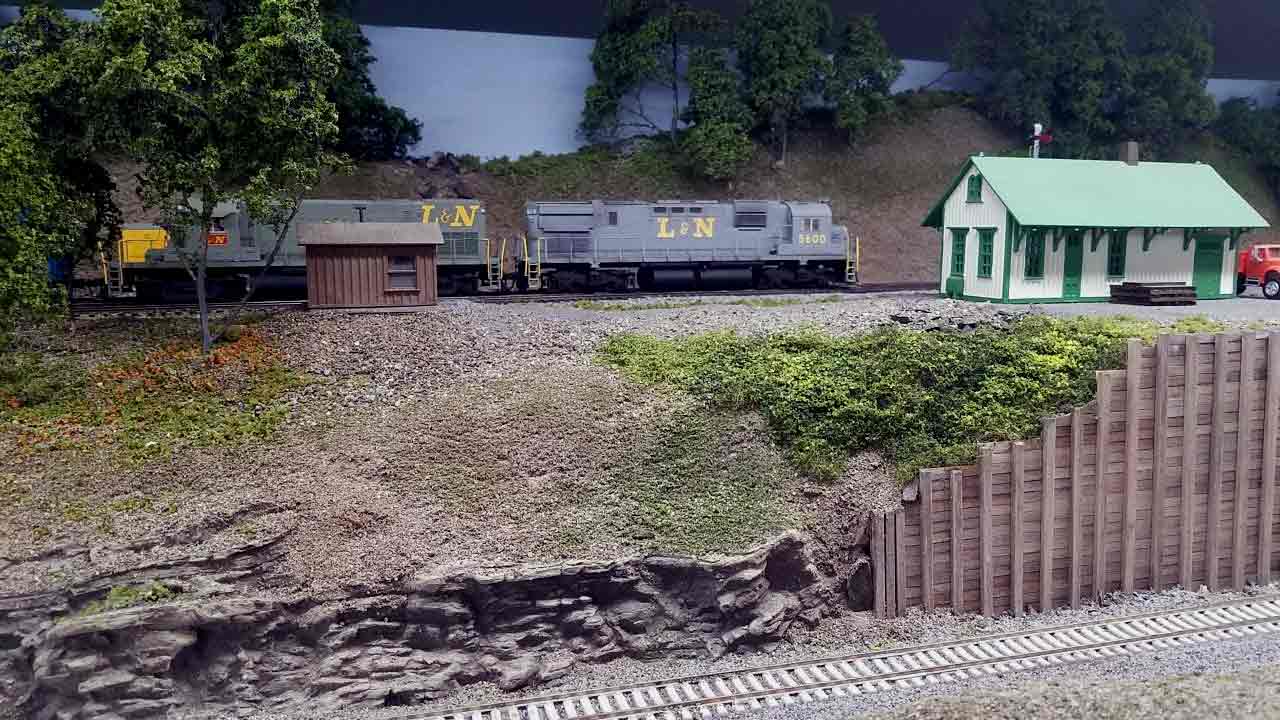
Scenery work continues in the area around the summit at Monteagle.  Unfortunately, it's going to take a lot of tress.  I have placed around 50 in this area and I probably need another 200-250.  Regardless it looks presentable and here we have the northbound L&N TBG2 (Tullahoma to Bowling Green) stopped at Monteagle for orders.  The L&N has trackage rights over the Madisonville Sub between Memphis Junction in Bowling Green and Sparta, TN via Cookeville Junction (staging).

L&N #5600 was one of three Alco C-430s owned by the L&N.  I picked up the DCC ready model off ebay about a year ago for $135.00.  When I finally got around to working on it, about a month ago, I found out it was a factory equipped with sound and included all the appropiate documentation.  Since there was no mention of it being sound equipped on the box, it can only be assuemed it was a factory mistake.  Regardless, I removed the Loksound decoder and replaced it with my standard Tsunami2 and TCS KA1 keep alive.  I sold the Loksound Select decoder on ebay for $86.


The Chip Processing Plant at Monteagle


Originally a coal truck dump was planned for this spot.  After doing more research, I decided to replace the coal dump with a wood chip processing facility.  Lots of chip are processed in this part of the country for paper mills and other uses.  

The process

I decided that the Walthers "Sawmill Outbuildings" kit would make a good starting point.

I changed things around an bit and here is what I came up with.  I repainted all the structures and added some light weathering,

Chip processing includes debarking.  Debarking equipment is not incuded with the kit.  I did a little research and decided on a roatry debarker and chipper.  I found this diagram on the internet and decided to loosely base my model on this drawing.

Most of the debarker and chipping machinery were built using parts from kit left overs and a few scratch built parts.


Here is the finished product.

The chip processing plant on the layout.  A lot of background scenery needs to be finished up before the plant can be "planted" in place.

And finally, here is a photo of the overall scene with the Monteagle deopot in the distance. 


As always, your comments & suggestions are welcome

sdepolo@outlook.com


Monday, April 11, 2022

Contstruction Update #43 - LIghting & Scenery Progress around Monteagle (Formally Cumberland)


Names & Locations

 
Rencently, several town//location names have changed.  The summit, that was originally named Cumberland, has been changed to Monteagle.  This change was made to avoid confusion with the Evansville-Chattanooga passenger train, the "Cumberland", and to better reflect the actual locations along the proto-freelanced Madisonville Sub's route.


Under-counter LED Lighting Fixtures

 
Lighting has been a problem on the upper level right from the beginning.  The four bulb four foot florescent fixtures were fine on the old layout.  The combination of "daylight" florescent tubes and halogen spots provided pretty good lighting.  Unfortunately the same lighting doesn't work when the track level comes to within 14" of the fixture.  Fortunately, the solution was right here in my kitchen where I am currently sitting.  During a recent remodel we had the contractor install LED lighting beneath the new upper wall cabinets. 


The fixtures I used are Amazon Basics 3-color temperature and 3 section dimming LED cabinet lights ($45.91).  8 fixtures will be required.  Once most of the scenery is finished, a 4" valence will be added.


This photo shows the difference between the old and new lighting.  The locomotive in the foreground is sitting under the new under-counter LED lighting fixture.  The other locomotive is illuminated by the existing florescent fixture


Cripplebush Rubber Rocks

 
I used over 500 pounds of Hydrocal to create the rock work on my old Sn3 layout; I hated the mess it made.  Somewhere along the line I stumbled across the rubber rocks from Cripplebush and decided to give them a try.  I ordered two samples of "shale" and here's the result using one of the rubber rocks.
 
I cut this mold down the middle, horizontally, and hot glued the two sections end to end making up a cut 46" long and 3" high.  The pre-colored rubber rock was then blended into the surrounding ground cover and dry brushed an earth color.  The track here is Micro Engineering Code 83 flex on concrete ties.  The ballast is a mix of light and dark grays from Scenic Express held in place with matte medium. The concrete ties, bigger rail, and fresh ballast represent a recent "state of the art" upgrade on the Madisonville Sub.  The area above the cut will eventually be covered by static grass.
 
I think the results are pretty good and the rubber rocks avoid the plaster mess.  The only downside to the rubber rocks is that they are relatively expensive.  This mold, "shale cut" was $40.00 plus shipping.

And here is what's left of the Rockwood Branch; quite the contrast.  The matte medium was still wet when this picture was taken so the tops of the rails have not been cleaned off.

Here is a up to date photo of the depot.  New lighting above this area will be installed tomorrow.  The depot should probably be repainted gray to more accurately portray Southern Railway practices of the 1970's.  Scenery level is about 75-80%.  The area still needs underbrush on the hillside, static grass, a few figures, and other details.


I'll end this post with a picture of how I progress through the scenicing process.  I normally start with a focal point, in this case the depot and work outward.  In the distance is what I consider to be stage 1, basic hardshell with a coat of earth colored latex house paint.  Next is what I consider to be stage 2 or at about 40% with the painted hardshell covered with paving sand and some ground foam.  Closer yet is what I consider Stage 3 or 60% with more ground cover, trees, and secondary structures.
 

As always, you comments, suggestions and questions are always welcome
sdepolo@outlook.com


Thursday, March 24, 2022

Construction Update #42 - Cumberland (Summit) Access Road

When I originally installed the roadbed around the summit (Cumberland), I included a pad for a small  depot.  About a year ago, I picked up the small depot shown in the photo from my local hobby shop.  It was about the right size, nicely built, and would serve serve as a temporary stand for the "future" Cumberland Depot.  All it need was a means of access.

The only way to reasonable access the depot, other than by rail, was by a bridge over the lower portion of the horseshoe curve leading to the summit and a retaining wall to hold back the hillside.  The Rix Rural Timber Overpass seemed to fit the bill and I just happened to have one on hand.


The bridge required a little modification but it worked out just fine.  Then a template was made using .060" Evergreen Scale Models styrene sheet stock.

The scale lumber 2x12's were cut to length, stained with Builders in Scale "Silverwood" and glued to the template with ACC. 


 The verticle 12x12's were stained and glued on with Aleeb's Tacky Cement.

The bridge and retaining wall installed on the layout.  The matching the color of the bridge to the retaining wall with have to wait until the new LED ceiling lights are installed.


Saturday, March 19, 2022

Construction Update #41- Plaster Cloth, Plaster Cloth & more Plaster Cloth

Work continues on the upper level scenery base.  About 80% of the upper level now has a layer of plaster cloth over the painters paper and cardboard web.  I prefer plaster cloth from Scenic Express.  It is cheaper and better, in my opinion, than that of it's competitors.


I did get sidetracked for a couple of days while the geography around thee "new" Grayson-McClure load out was modified.  The load-out, built from a Walthers kit, has moved around the layout from one future load-out site to another for over a year.  Finally, it was decided that the small 1 or 2 car load-out at the end of the aisle was the best location. 
 
The location did involve a rework of the existing scenery base.  The painters paper and cardboard webbing were cut away from behind the load-out and a access road built from styrene was set into the side of the hill.  The spur was also moved about a inch forward, towards the aisle, to make room for the road.


 And here is the end result.. 


Turning around, the mainline on the lower level, crosses a bridge, enters a tunnel and wraps around a horse shoe curve towards the summit.  Again, several days were spent making changes in this area.   


Originally, the Rockwood Branch crossed over the mainline, passed over the entry door, and terminated in a short 2-track staging yard.  While I liked the operational aspect of the branch, I never liked how it looked.


Here's how it now looks. 


A bridge was also added.  The 2 Atlas RS-11's, shown here drifting down grade after helping a feight up the hill, will eventually be renumbered and sub-lettered for the MBG&C.  Actually, the Southern only rostered one RS-11: it was owned by the Carolina & Northwestern, a Southern subsidiary.  The spur, that shows up just above the locomotives is a remnant of the trunkcated Rockwood Branch.


The tracks wind around the horseshoe curve leading to the summit and emerge from this cut.


Location & Name Changes

 
My recent YouTube video's have bought in a lot of  useful comments.  About a week ago, I received a comment about the area I am modeling in Tennessee.  As a result, Palmer, TN is going to replace Coalmont on the layout and Monteagle is goiing to replace Grundys.  In addition, The Union Coal Company mine will become the Tennessee Consolidated Coal Company. 

The Palmer depot and Tennessee Consolidated Coal company store.


The Tennessee Consolidated Coal company store at Palmer, TN


As far as I can tell, coal mining all but disappeared from Grundy County in the late 1950's and the rail line was abandoned during the 1990's.  Fortunately, on my version of  Palmer, coal mining in the region is still viable during the mid 1970's.

The Tennessee Consolidated Mining Company processing plant.  Date unknown but probably, based upon the rail cars, during the 1930's.  A modernized version would make for a great model.


As always your comments and suggestions are welcome.\
sdepolo@outlook.com

And, if you haven't seen them, I have 4 videos of the layout posted on YouTube
Search "Madisonville Sub"

.


Monday, March 14, 2022

Contstruction Update #40 - Hardshell on the Upper Level & First Working Signals

A Change of Pace

 
Every once in awhile, a change of pace is nice.  After nearly two years, I made the decision to go back and work on the upper level.  Some basic scenery was installed on a portion of the upper level during the Spring of 2020.  Construction Update #10 (June 27, 2020) covered the process.  Basically, I used profiles made from pink foam, covered by a web of cardboard and then a layer of painters paper glued to the webbing.
 
The upper level includes a horseshoe curve circling back on itself on a 2.5% grade towards the summit at Cumberland.  When I was working on the scenery back in 2020 I stopped short of the curve because I wasn't sure how to scenic the area.  Ultimately, I decided to only scenic the isle side of the loop and hide the back side in a tunnel and cut.  This would allow access to the back side of the loop from below.
 
The Tunnel #3 portal at the lower end of the loop.


 Looking down grade from the same spot.  The hot wire cutter is sitting on the lower portion of the curve.  The bottle of glue is sitting on the upper end of the loot.


Tunnel #3 portal after the application of the cardboard webbing.

Tunnel #3 portal after the application of the painters paper.

Tunnel #3 portal after the application of the plaster clot.

The First Operating Signals

 
Since this portion of layout will feature signals, I decided to add them along with the basic scenery.  The signals, cabling, and signal control boards are all part of the "new" Atlas Signal Control System.  The Atlas system is easy to install and can replicate anything from simple ABS to a form of CTC.  The first two working examples on the Madisonville Sub are simple stand alone intermediate block signals.
 

Each signal requires a signal control board.  These two are attached to the benchwork below the signals.  I mounted the signal control boards on a separate piece of plywood.  I drilled four holes in the plywood, 2 on the top, 2 on the bottom.  I used the top 2 to mount the plywood "lower" while hooking them up.  Once the wiring was done, the lower holes were used to raise the board out of view.  The signals are plugged in at the top (black plug).  The red a white wires along the bottom are power in (12 volts DC).  The black wires are connected to the block detectors. 

Block Detectors

And lastly, here's a picture of my friend Kurt's SP Layout.

As always, your comments and suggestions are always welcome

sdepolo@outlook.com


Friday, February 11, 2022

Construction Update #39 - Adding Valences to the Lower Level

Videos on YouTube

For those of you who are interested, I have posted three videos of the Madisonville Sub on YouTube.  You can find them by to a search for "Madisonville Sub"

Valences

In general, it is a better idea to complete your valences before adding track, structures, scenery and other details.  Unfortunately, I didn't realize how much a difference it would make until I was working on the scenery around the Southern Kentucky Transfer & Pace Chemicals.  It was then, when I started taking a few pictures, that I found myself cropping out a lot of "empty" sky in the photos.

Before Cropping:


 After Cropping:


I think it pretty apparent that the second photo is better than the first.

Building the Framework


It should be noted that I am only concerned with the perimeter walls at this point.  The center peninsula is a mushroom style design so valences for the lower level were part of the original design. The first section of valence was built of the Southern Kentucky Transfer/Pace Chemical scene shown in the above photos.

Light weight pine boards form Lowe's were used.  Note that the front section of 1x4 was left off the frame when it was initially attached to the wall.  This was done to reduce weight and make it easier to level and attach to the wall.  Corner clamps, carpenters glue and drywall screws were used to assemble the frame.  The bottom of this frame work is 20" above the base of the lower level.  The frame was attached to the wall (studs) using 2.5"


After the initial framework was installed, the front section was installed.  At this point the holes for the LED strip lighting were also drilled.


To the right of the Southern Kentucky Transfer/Pace Chemical scene is the L&N/General Motors Plant scene.  Directly above this scene is a portion of the upper stating yard.  The staging yard is only12" wide and the lower scene is 24" wide, the valence couldn't be attached directly to the staging yard framework.  Brackets were made from 1x2 and 1x4 pine.  Again corner clamps, carpenters glue, and drywall screws were used to hold everything together.

The valance is made from 3/16" tempered Masonite.  The bottom of the valence is 18" above the lower bench work.  This is the perfect height for anyone around 6' tall.

And, with the valence lighting on and the room lights off.  I am still experimenting around with LED lighting.  This string was marked "natural".

The lights in this section are "cooler"


And one more thing....

 
Our resident bear showed up for the first time this year.  I snapped off a couple of photos after he sampled the contents of our trash can!


As always, your comments & questions are always welcome
sdepolo@outlook.com

And don't forget to check out the videos on YouTube
Search "Madisonville Sub"