PMCHY

PMCHY
The Dragging Equipment Detector at State Line, KY

Monday, September 6, 2021

L&N #5600 - Pace Chemical Part 1 - Moving the GM Plant - And more

L&N #5600

 
I have always had a fondness for Alco power, especially the C-430.  Alco only built 16 examples of the C-430 including 3 demos which ultimately ended up on the L&N.  An L&N version finally showed up on ebay and I decided to buy it regardless of cost.  Here it is, fresh out of the box, at Preston Miller, on the head end of a trackage rights train bound for the L&N at Tullahoma, TN.
 
.

A Bit More Scenery

 
During my recovery, from the accident, I managed to ballast most of the Preston Miller Yard and add a bit more scenery along the backdrop between Reinhart Foods and the freight house.


Pace Chemical - Part One

 
Over the last couple of months, several changes have been made to the lower level of the layout that freed up some space for additional industrial development.  During this process, I remembered a few pictures I took of the Univar facility in Kent WA.  Univar receives various chemicals, primarily in tank cars, and distributes them in the form of acids, essential chemicals and additives, oleochemicals, oxides, polymers and resins, silicones, solvents and process aids in both liquid and granular forms.  Most of these products are shipped to local end users by truck.  As a result, I decided that a similar complex located along the Madisonville Sub would make a great destination for tank cars and possibly a box car or two.
 
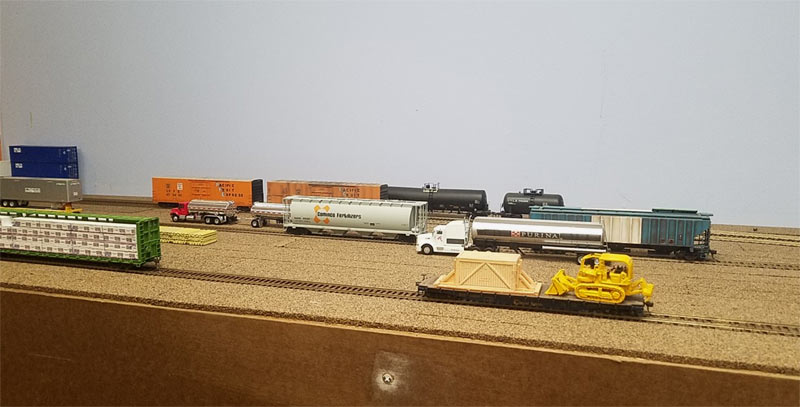
The actual location is on the L&N Bowling Green/Smith Grove portion of the layout behind the Southern Kentucky Transfer.  I have about two inches to work with for the main building, behind the tank cars in the following photo, between the far track and the backdrop.

 
Getting access to the Kent, WA complex for additional photographs is just about impossible.  Instead, I turned to the internet. Here is an overhead view looking north.  The BNSF main line is off  to the west (left) running south to north.  The spur curves around a 90 degree curve from the south, passes through a empty lot, a gate, and into the complex.  There is a loading rack for tanker trucks just to the east (right) of the main structure.  The large building is pretty typical of the other "tilt up" style concrete structure in the area.  Due to the lack of skylights, vents, fans, ducts, or air conditioning units on the roof the building appears to be nothing more than a warehouse/distribution center.  There is an attached office building on the north side of the main structure.
 

When I originally explored the site, there appeared to be pipes running the length of the building.  I thought the tank cars were unloaded along the entire length of the structure.  From my vantage point, near the single tree in the center left foreground of the photograph, I couldn't see the yellow loading/unloading racks.  It was only after I studied the aerial photographs that I realized that the six cars on the left along with another five or six cars further down the spur to the west were off spot waiting for the cars on the right to be unloaded and moved.
 
There are four loading/unloading racks.  Three of them show up in this photo, again looking south to north; one on the near track, two on the far track.  The track arrangement is obviously a time consuming challenge for the local switch crews.


The fourth loading/unloading rack, viewed from the east, is located at the end of the spur.


The Model


Due to space limitations, I am only modeling the area on the south side of complex (below the red line).  I also had to flip the structure horizontally and have the complex accessed from the east (right).  Three Walthers kits (933) can be used for a majority of the complex.  The tilt up warehouse will require a rather simple kit bash; the loading racks can probably be used as is.  The storage tanks, from a number of sources, along with a Pikestuff kit bash will also be required.

Aerial photograph flipped horizontally:

The main or east end of the warehouse building was assembled using parts from the Walthers Modern Concrete Warehouse.  Assembly of the main portion was pretty simple.. The modules can be used to adjust the overall length, depth, and door or window types and location.  The only modifications I made were to the side walls.  I cut the width of the two corner panels down to 2" and glued them in place.  The building has no back wall or roof at this point.

Assembling the west end of the building was a little more complex.  The prototype has a covered, open sided, loading dock that encompasses most if not all of of one end.  Since I only had two inches of depth to work, my model couldn't be quite so open.  After given it a evening of thought, I decided to cut a portion of the side wall in half, horizontally, recess the lower portion, and add a loading dock.  The gray panels were left over from a previous kit bash.  Four end panels were cut down and glued back to back to create the end sections.

Here is a picture of the back side.  It illustrates how the modular side panels are held together.  I normally add styrene strips at the corners to increase strength and stability.


Other Projects - The General Motors Assembly Plant


Over the last month, other changes have taken place on the Madisonville Sub.  I decided switching industries was a lot more rewarding than having a bunch of trains running across the subdivision from staging yard to staging yard.  The Bowling Green General Motor Assembly plant moved around the corner and now occupies what had been the visible portion of the lower staging tracks.  The small L&N locomotive servicing facility also made the move.  Pace Chemical will be just out of view on the left.  Moving the GM plant freed up about 10 feet along the north wall of the room for another new project.
 

The Accident(s)

 
A number of people have called or emailed to ask how my recovery is going.  After about a month, I am back to about 80%.  The doctors told me a full recovery will take about 2 months.
 
 
To summarize, I managed to fall off my 1947 8N Ford tractor while trying to avoid a large stump.  I struck the stump with the right front tire, the tractor tipped to the left, my foot slipped off the clutch and I fell beneath the left rear tire.  Luckily, I managed to turn off the tractor as I fell.  While the tractor didn't go over my knee replacement, it did go over my ankle and come to rest below my knee on the inner side of my left calf... "ouch".  Luckily, my daughter was visiting and she new how to drive the tractor.  She started it up and managed to free me by backing off my calf and over my ankle for the second time before the medics arrived and took me to the hospital.  Luckily, nothing was broken but I did suffer extensive deep bone and soft tissue bruising, scrapes and abrasions.
 
A week after the "Predator" ran over my leg, my weenie dog Gertrude managed to slip a disk while chasing after Cooper (Pam's cat).  Six hours later she had back surgery to the tune of $8,000.00 and my $200 a month train budget was wiped out for the next 5 years!  After 3 weeks her recovery is going well but she will be confined to a 2'x3' crate for most of the time over the next 5 weeks.  I guess both of of will get back up to speed about the same time.

Fortunately, Pam agreed the cost of Gert's surgery shouldn't have to come out of my train budget.


As always, your comments and suggestions are always welcome
sdepolo@outlook.com


Sunday, July 25, 2021

The Diesel Servicing Facility and Shops at Preston Miller - Operations - Mixed Trains


The area around the roundhouse and turntable is about 85% finished.  It is still lacking a lot of little details and figures but it is time to move on.  As the mood strikes me, I will add details as I go forward a little bit at time.

Just to left, or west, of the roundhouse is the "new" diesel servicing and shop facility.  The two structures were kit bashed while I was recovering from my first knee replacement.  Three kits from Pikestuff make up the complex.  The pad is styrene concrete and the stalls have pits modified for use with code 70 rail.  The complex, built at my desk, sits on its own base.  The toggle switches along the fascia are on/off switches various sections of track within the complex (The noise from 7-10 sound equipped locomotives can be a bit much).

The three Southern units are sitting on the inspection track.  The stores department is located behind, to the left, of the covered pit. Two tracks run into the shop building with one track extending all the way through the building and out the far side.  The inspections/stores building and shop are separated by a office/admin building.  The fuel and sand tracks will be in the left foreground where the narrow pad of concrete extends off to the left.  Two tracks run into the shop; one extends all the way through the building.  The Preston Miller Yard lead runs behind the shop building.


Ballast for the engine facility and yard is a mix of 2 parts Highball cinders, 1 part Arizona Rock GN/SP Gray and 1 part Arizona Yard Mix  Still some work to be done including servicing details, figures, etc. ground cover and some static grass but the scene is approaching the 80% point that will allow to me to move on.


Operations -  Developing a Freight Car Fleet


Alert... Before going any further, I want to warn you that I can't believe I went through all of this to come up with the information for some software data files or to fill out a couple of hundred 4 destination Micro Mark two sided waybills.  If you are not interested, to the degree that I am in operations, you may want to skip down to the section on mixed train service.

 
Backdating the railroad has meant changes to the freight car fleet and operating scheme. 
 
As some of you already know, I use Caroute Version 6 for windows from Decapod Systems for generating switch list on the Madisonville Sub.  The Caroute system is basically an automated version of the 4 destination waybill and car card system offered by Micro Mark.  But, instead of carrying around and sorting a bundle of car cards, Caroute generates a switch list. I went over the Caroute program in some detail in the August 27, 2020 Post.  A link to it can be found in the Blog Archives on the right.
 
Regardless of the system you use, I think there are a number of logical steps one should take before creating the 1975 era data files for Caroute or creating a stack of Micro Mark car cards and waybills. 
 
I started by preparing a 1975 era schematic illustrating my route structure.  The sections highlighted in gray are represented by staging.  


Another chart was then prepared illustrating extended connections.


Towns & Industries

 
Next, I did  a internet search and came up with a list of the largest industries located in or near each of my towns.  While I know that some of the industries listed weren't around in 1975, including the GM assembly plant in Bowling Green (1981), they were included anyway.  
 
Here is the list for Bowling Green.  I made a list for each of my towns.  After reviewing the lists, I choose the industries I had space for and highlighted them in yellow.  Existing space on the layout (spurs) and car type were the major criteria for picking the industries.


Rolling Stock


After I decided to back date, it was pretty obvious that some changes had to be made in the freight car mix.  The first thing I did, was remove about 40 cars.  These included cars that were two modern or didn't logically fit in.  Unfortunately, those included my fleet of orange Red Caboose and Intermountain Railway Tropicana 57' reefers I had accumulated over time and significant expense.  The Tropicana reefers went into a storage box along with a few of my other favorite cars.  Since I have no interest in "collecting" locomotive or rolling stock, the rest are being sold off. 

So, how many freight cars do I need?  To answer that question, keeping in mind that I don't want the layout crowded to capacity or looking like a museum, I developed the following chart.  The quantities are just estimates and due to the limitations of the Caroute software, most but not all cars will take 4 "operating sessions" to complete a routing cycle.  Additional cars can be added to represent overhead traffic (Car not originating or terminating on the Madisonville Sub.).


Now...  All of this seems like a lot of work to this point, but I kind of enjoyed the process.  And, there is bit more.  I inventoried my rolling stock and assigned it to an industry.  Every box should be  filled so I am short a few cars.


And finally, since all of my cars are routed or received from off line points, a rolling stock interchange chart was created along with all the information needed to create the Caroute data files or the Micro Mark 4 destination waybill.


All of these charts were created with Excel so it is easy to go back into the spread sheet to add new cars or make changes.

Mixed Train Service

A post or two ago I mentioned the addition of mixed train service to the Madisonville Sub.  To that end, I added a old AMM combine to the roster (still on my work desk undergoing modification) and a new Bachmann combine that I found left over from my store inventory.  While I plan to add some grabs and weathering to the Bachmann combine in the near future, I decided to press it into service now on the Sparta mixed.  The daily Sparta Mixed originates in Madisonville (staging) and runs through Bowling Green to Sparta (staging) and returns to Madisonville.

Led by Central of Georgia GP-7 #130, the short mixed is about to cross the Cumberland River near State Line.


A few miles south (railroad east) the old heavyweight combine has come to a rest in front of the small Westmoreland passenger shelter.


And finally, we catch the mixed passing by the company houses and MOW yard just outside Tunnel 2.


As always, feel free to email me your comments or suggestions at
sdepolo@outlook.com


Wednesday, July 14, 2021

Progress to Date - 18 months in Review

The Madisonville Sub layout and blog, as they exist today, were started in November of 2019.  For those of you who have been around since the beginning or joined in along the way and for those who are new to the blog, I thought I would use this posting to briefly review progress to date.  There are 40 plus easy to acesss posting at www.madisonvillesub.blogspot.com that cover the subject matter in detail. There are posts on lcomotives, rolling stock, weathering, scenery, operations, signalling, structures and more.  They are listed in the Blog Archive on the right.  In addition, I have cleaned up and increased the font size on all of the earlier posts to make them easier to read.  As always, your comments and suggestions are welcome.  

And finially, if you would like your name to be removed from the blog's email mailing list, please let me know.  And thanks for the over 4.000 individual views to date.

sdepolo@outlook.com

December 11, 2019 - The Beginning

 
Prior to October of 2019, I spent some time thinking about my then current Sn3 layout.  It was about 85% complete and quite frankly it had run it's course and I was board with it.  On the 8th of October 2019 I had my first knee replacement and I spent the following 2 months planning the new layout.  Initially, I thought about doing at contemporary switching layout similar to Lance Mindheim's "Downtown Spur".  But soon after, I decided that I wanted the challenge of building something else; a mushroom style layout.
 
The proto-freelanced plan was originally based upon a regional railroad running from Madisonville, KY on the north end to Chattanooga, TN on the south end.  The overall size of the layout is 27' x 23'  The plan, as originally drawn, can be seen in the December 11, 2019 post.  Here is a up to date plan.


The Mushroom


Most of January and February of 2020 were spent building bench work


By the beginning of March, pink foam was being installed on the L-Girder bench work.  On the lower level it is three inches thick and dead level.  The back drop is tempered masonite.  The summit, on the upper level of the mushroom is directly above this area (State Line, KY) 
 

The easy to apply backdrops were purchased from Trackside Scenery.  The roadbed is cork.  The bridge here was built using a combination of Walthers kits.  Track and turnouts are Micro Engineering Code 70

 
By early May, track had worked its way up the helix to the summit at Cumberland Gap.  Most of the visible curves on the layout are 36" plus.  The helix has a radius of 30" on a 2.2% grade.  The sub roadbed on the upper level is cabinet grade plywood.  At this point, all the track work is operational except for the upper and lower staging yards. 

 
Tests revealed that 30 car trains with a mix of cars, up to 89' TOF's, went up and down the helix without any problems.  All of the locomotives are equipped with Tsunami2 sound decoders, KA1 or KA2 Current Keepers, and TCS 1740 speakers and enclosures.  The layout uses a NCE wireless Pro System.


The scenery base on the upper level is a combination of pink foam profiles, cardboard lattice work and painters paper.  The painters paper scenery base is quick, inexpensive, gives the area a semi-finished look, and most importantly protects the lower level from falling objects.  By the beginning of July, my grandson and I were holding informal operating sessions.  The northbound train on the upper level is waiting at the end of double track for the southbound headed towards a meet at Cumberland Gap (Summit).

 
Progress slowed during October and November of 2020 following my second knee replacement.  But the completion of the upper and lower staging yards was finished by the end of January 2021.  Then scenery work started in earnest on the lower level.  The railroad was also being backdated from around 1995 (CSX) to 1975 (Southern/Central of Georgia)
 
The river crossing at State Line.  Basic ground cover is paving sand from Home Depot.   Natural materials, static grass, ground foam, and Super Trees from Scenic Express are also used.


 Tunnel 1


Tunnel 2 (Bottom of helix) and Company Houses.  The company houses are from Walthers and the figures are from Woodland Scenics.  The tunnel portal came from CC Crow.
 

The CEMEX plant at Westmoreland.  A combination of kits were used.


The Village of Westmorland
 

Central Kentucky Grain (Bowling Green)
 

 And most recently, the Roundhouse at Preston Miller Yard (Bowling Green)
 

Sunday, July 11, 2021

The Roundhouse - 1975 Era Operations - Motive Power - Locomotive Programing - Signalling

The Roundhouse at Preston Miller

 
Before moving on to another topic, I thought I would include a up to date picture of the roundhouse at Preston Miller.  I started working on the roundhouse during the first week of June.  I started working on the scenery around the 12th of June.  The scene, as of the 5th of July, still isn't complete, but its about 80% done and presentable.  I still need to add figures, a few more vehicles, and other small details.


The change to 1975 Era Operations

Originally, I envisioned the MBG&C as a semi independent 1995 era Class III railroad with close ties with the CSX.  Unfortunately, in 1975 that scenario doesn't work very well.  The CSX merger didn't take place until 1986 and the area I model was dominated by the Louisville & Nashville.  In 1975 the L&N, like most major railroads prior to the Stagger Rail Act of 1980, had not really started to abandon or spin off secondary or redundant rail lines to short line or independent operators.  So, where does that leave the MBG&C? 

I have always been a fan of the Central of Georgia.  In fact, it is the only historical society I currently belong to or have donated to in the last 4 or 5 years.  So from both a fan's point of view and a logical point of view, the MBG&C beaome a subsidiary of the Central of Georgia and/or Southern Railway.

The Central of Georgia Railway reached Chattanooga (the Southern end of Madisonville Sub) in 1891 through the purchase of the Chattanooga, Rome & Columbus Railroad.  And, in my version of history, it reached as far north as Bowling Green and then Madisonville, KY prior to the turn of the last century.  In 1963 the Central of Georgia was acquired by the Southern Railway and in 1971 the Central of Georgia Railway was combined with the Georgia & Florida Railroad, the Savannah & Atlanta Railway, and the Wrightsville & Tennnile Railroad to create the Central of Georgia Railroad.  Following the merger, the Central of Georgia from the track side point of view, slowly started to fade into the Southern.  Interestingly enough, even after the Central of Georgia lettering on the side of locomotives was changed to Southern, locomotives still carried "CofG" lettering beneath the cab side numbers well into the Norfolk Southern era.

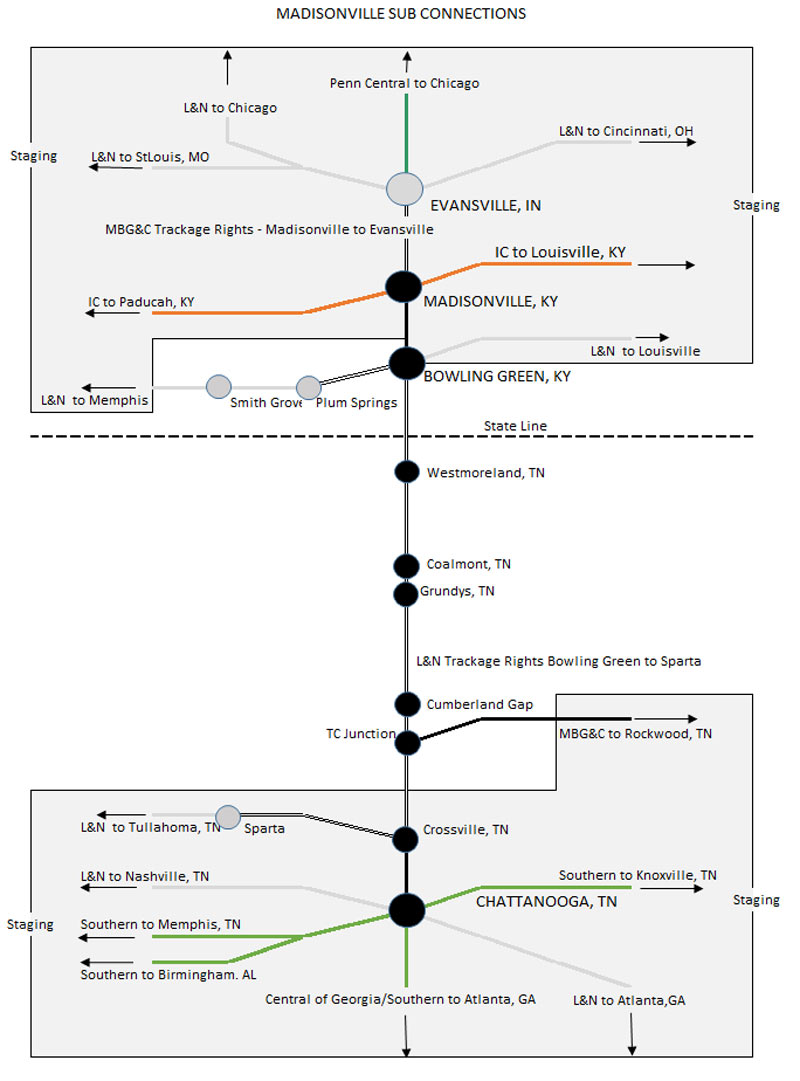
The 1975 era MBG&C Operating Schematic.  Note that the Madisonville Sub has been extended north, via L&N trackage rights, to a connection with the Penn Central at Evansville, IN.  In all likelihood, in 1975, the Illinois Central and Louisville & Nashville in Madisonville would not have been a friendly connection for the competing Central of Georgia/Southern subsidiary.  In exchange, the L&N has trackage rights over the Madisonville Sub to reach the east end of the L&N's Sparta, TN branch. 


Along with the above mentioned changes, I plan to give the railroad a more "rural" feel; somewhere between a branch line and a secondary mainline.  This, again, is consistent with my preferred "laid back" type of operations. 

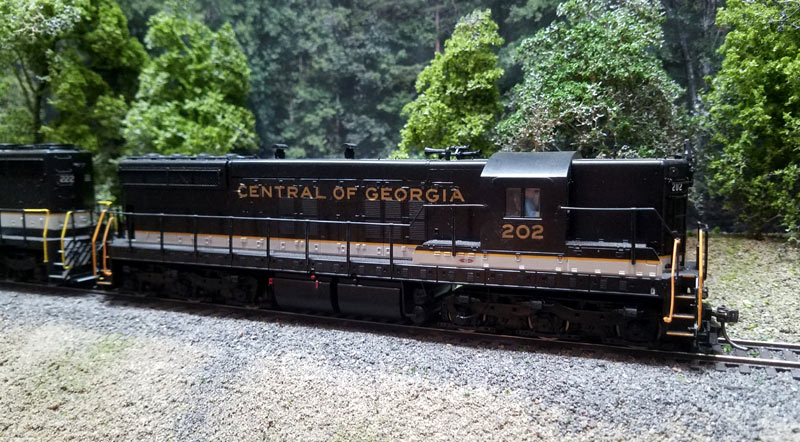
This SD-9 paint scheme pre-dates the 1971 merger but, on some units, itlasted much longer.  This is a custom painted and detailed Proto 2000 shell mounted on a Walthers Proto chassis.  It is equipped with a Tsunami2, KA1 keep alive and a TCS speaker & enclosure.


Here is a Proto 2000 factory painted SD-9.  The 3 digit number indicates ownership, probably for accounting purposes, by a Southern subsidiary.
 

And in this case, its another Central of Georgia SD-9


The last new locomotives purchased and lettered for the Central of Georgia were 10 EMD SD-35's in 1966.  The 222 is a factory decorated model from Atlas.  It is also equipped with a Tsunami2, KA1 current keeper, and a TCS speaker and enclosure.

Central of Georgia # 130 is a Athearn Genesis factory painted GP-7.  These are extremely difficult to find so I took what I could get and bought a non-sound version off ebay.  I added my standard Tsunami2, TCS KA1 Keep Alive, and TCS speaker & enclosure.  Athearn also made a version lettered for Southern but with CofG sub-lettering under the cab number.  Eventually I hope to find one of these.  Other Southern models have also been done with the CofG sub-lettering.  When it comes to Southern subsidiaries, models are easy to spot.  They normally, but not always, carry a 3 digit number instead of the customary Southern 4 digit number.


Tsunami CV Settings

 
Several people have sent me questions about my "basic" Tsunami and Tsunami2 programing.  Every one of my locomotives get the following changes before they ever get on the layout.  I also program CV17 and CV18 for the long address.  There is a simple program on the internet for determining these values (http://www.ruppweb.org)

 
The following table list the values for CV67 through CV94 (user loadable speed table).  These values closely match those associated with CV25, value 11 on the original Tsunami and provide a much flatter speed curve at lower speeds.  And the combination of momentum and a flatter speed curve will result in excellent low speed performance and realistic notching of the prime mover.

 
Once I am done with the initial programing, I make some further adjustments on the layout. I usually lower the prime mover volume (CV 131) to around value 100, the bell volume (CV 130) to around value 65, and the whistle volume (CV129) to around value 85.
 
And finally, I program my locomotives to respond as realistically as possible; they seem heavy, real heavy,  and there are no jack rabbit starts or stops possible.  Its not for everyone, it takes a little practice, but I think everyone should give it a try.  Oh, and while I haven't tried it, I think Loksound decoders feature user loadable speed tables.
 

Atlas Searchlight Signals....  At Last!

 
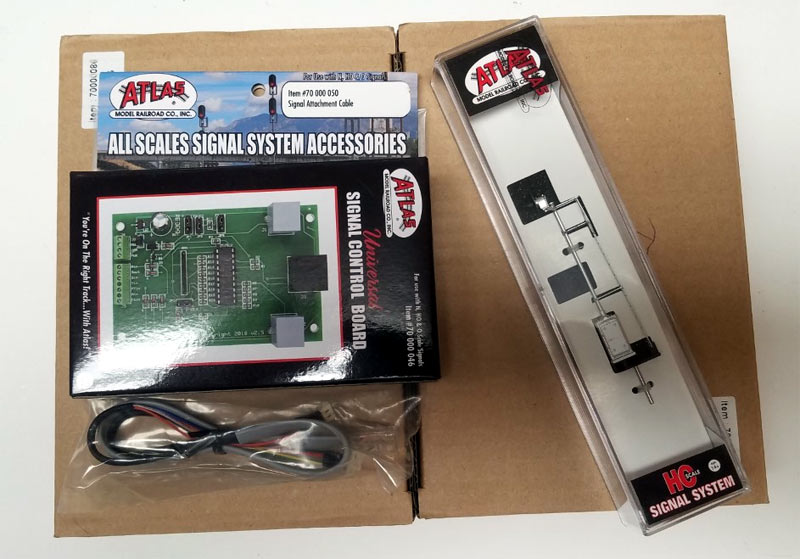
Yep... They finally arrived after over a year.  Atlas announced them in November of 2019, I ordered 12 of them in January of 2020 and they arrived today (July 11)  They are based upon the old BLMA signals and are exquisite.   I now have all the components to install the signal system including the signals, signal control boards, cabling, and block detectors for 7 ABS blocks and one interlocking/CTC section protecting the helix. 


Speaking of block detectors, I found these from Parkdale Hobby on ebay.  They are similar to the ones offered by NCE but include a couple of enhancements; a time delay circuit and a pot for adjusting sensitivity. 


Mixed Train Preview

 
In addition to the Cumberland, #3 and #4 mentioned in the last post, I decided that a mixed operating between Bowling Green and Sparta would make a nice addition to the Madisonville Sub.  
 
Several railroads, originally chartered in Georgia, were required to provide passenger service in order to retain state tax credits.  The Georgia Railroad was one such railroad.  Not wanting to risk the loss of those tax credits, the Georgia Railroad maintained mixed train service until 1983.  Most of the Georgia mixed used old heavyweight coaches or combines. 
 
A Georgia Railroad mixed at Camak, GA circa 1964.  Roger Puta Photograph


A couple of weeks ago, I ran accross an old AHM combine at my local hobby shop.  It was inexpensive, about $10.00 as I recall, so I bought it with the thought of changing out the trucks and couplers and placing it in mixed train service.  It's currently on my desk undergoing the conversion.  In addition, I also discovered a Bachmann heavyweight combine in my stack of left over store inventory.  As a bonus, the Bachmann combine is already lettered for Southern.   I should have them ready for service and photographed for the next post.

As always, your comments and suggestions are always welcome
Email me at sdepolo@outlook.com