PMCHY

PMCHY
The Dragging Equipment Detector at State Line, KY

Friday, November 27, 2020

Construction Update #14 - State Line Kentucky, Part 1 - PInk Foam & Plaster Cloth

A Quick Note about scenery

 
My previous layout was set in Alaska with rocky cliffs and evergreen trees. My current layout is set mostly in Kentucky where the terrain is dominated by rolling hills and meadows in the central part of the state and heavily forested areas of hills and mountains in the eastern part of the state.  As a result, I have little or no experience dealing with scenery in the Bluegrass Region.  I guess we'll see how it goes.
 
For reference, here is a picture of the old layout 
 

 And here's what I am aiming for.


Pink Foam Base

 
Unlike the upper level, the lower level of the layout sits on 3" of  pink foam.  One of the nice things about working on a 3" base is that you can easily remove up 2 1/2" below track level.  Along the narrow shelf  leading toward the Cumberland River (New Name) and State Line, I wanted the roadbed to look like it was cut into the side of a hill.  The roadbed west of the Cumberland River scene is only 8" deep so I decided to cut away the fascia with my jigsaw and then create a slope by cutting the pink foam with a hot wire cutter.  The pieces left over from cutting away the foam on the aisle side of the tracks was used to build up a slope on the far side of the track.  I apologize for some of the pictures in advance.  They were taken with my cellphone with available light.
.

The Cumberland River scene is about 20" wide.  I built up the contours using pink form.  Normally I would smooth out the contours with a surform tool but the hills in this area will be covered with a thick blanket of SuperTrees and the abrupt changes in contour won't show.

I decided to cover the pink foam with plaster cloth.  My backdrops were made by Trackside Scenery and moisture will damage them.  In order to protect them from the wet plaster cloth, I slipped thin sheets of styrene between the foam and the backdrop.  Then I taped paper towels over the track to protect it from any dripping plaster.  I removed the paper towels to apply the plaster cloth to the aisle side of the tracks.

I cut the plaster cloth into 1-2" strips and 3-5" strips and put them in two aluminum trays.  I poured warm tap water in a third aluminum tray and applied the plaster over the foam.  There are a lot of tutorials out there on using plaster cloth so I'm not going to go into a lot of detail here.  But there are two things to consider:  First keep the plaster away from your track.  If you get some on the track clean it off; it will show up in photographs.  And, second all plaster cloth is not the same.  I have found that the plaster cloth sold by Scenic Express is better and cost less than that sold by Woodland Scenics.  You can buy the Scenic Express plaster cloth direct or your dealer can get it from Walthers and possibly others.

It took 3 rolls to complete the entire scene.  I let the plaster cloth cure for two days before I went on to the next step.  I used the time to study up on making SuperTrees and applying static grass on YouTube.

I have found the flat exterior house paint works well for a scenery base coat.  I went to my local Ace Hardware a purchased a gallon of flat exterior house paint and had it mixed to a gray/brown tone.  I used the same styrene to protect the backdrop and applied the paint with a 3" brush.  I removed all the bridges during this stage.  I have since replaced the wood trestle but not the concrete abutments and girder bridges.  Next up is spraying the track but that will have to wait until tomorrow.  The base coat is still wet.  I've gotten this far in 4 days working 2-3 hours a day.  That's about all my new knee will tolerate standing on a concrete floor.


More Covered Hoppers for Phosphate Service

 
I also managed to finish off a couple more of those Accurail 4750 covered hoppers for phosphate service.  These were weathered entirely using oils. 


Wednesday, November 11, 2020

Covered Hoppers for Phosphate Service

 But first, a Locomotive Update

Before getting started on covered hoppers, I thought I would post a photo of the "new" Norfolk Southern units in action.  Here is shot of the PMNSF (Preston Miller to Norfolk Southern Forwarder at State Line.  The trailing unit, a GP-38, is still in Southern paint.  I originally had the #3975 set up to run long hood forward.  After reviewing a lot of photos on the Net, I decided to set it up short hood forward.  First, I liked the way it looked running short hood forward and second, it made setting up consists less confusing. 


Following the last post, I received a email asking for a picture of how I install and set up decoders in my locomotives.  Here is a photo.  Note that I have removed the rear weights in order to make room for a large speaker.  I attached the speaker/enclosure to the inside of the shell, beneath the radiator fans, facing downward.  The TCS Keep Alive's (Green) are attached to the top of the Tsunami2 decoders.  Some people find it hard to believe that there are sections of track on my layout that have NEVER been cleaned, I use insulated (dead) frogs, and I don't have stalls. I am now using LED lights from Evans Designs.It takes me about 45 minutes to do one of these installs.


And now on to covered hoppers


About 18 months ago, my good friend Kurt Boyd and I spent a week or so in Florida.  Kurt's son, Matt Boyd, is a pitcher for the Detroit Tigers and we were in Lakeland, Florida for Spring Training.  While were there, we got to spend some time in the Bone Valley and take in CSX's operations in the phosphate capital of the world.  The CSX was using hundreds of older covered hoppers to move phosphate fertilizer from Florida to the Midwest.  As a result, I decided that the Madisonville Sub would benefit from some of that traffic.  

I have several Tangent, Exact Rail, and Intermountain Railway covered hoppers on my layout.  While these are great models, they are expensive, and in my mind, to fragile for use on a operating model railroad.  After doing a little research, I decided Accurail's PS 4750 covered hopper fit my needs perfectly.  They are nice layout quality models, easy and fun to assemble, and come in a variety of road names including CSX that can be easily modified for use in phosphate service.

For those of you who have not built one of the Accurail 4750's, here's what they look like and what you will need to build the model.

You may want to build your first car following Accurail's instructions.  I did, but only the first model.  Following the first model, I developed the following sequence.  Clean the weight with alcohol, roughen up with sandpaper, glue it to the Underframe with ACC, and set it aside to cure.

Next, cut the End Frames from the sprues.  Be careful, they are delicate. Clean up any rough edges with a file.  There are 3 small square holes along the bottom to attach the Cross Over Platform that sits above the coupler pocket.  I found that enlarging the holes slightly with an Xacto knife made it easier to add the platform.  Before installing the Cross Over Platform, and the Brake Wheel, install the Chain Fulcrum.  You will have to open up the slot in the Chain Fulcrum or it WILL NOT FIT into place on the End Frames.  Then, I added the Brake Wheel and Cross Over Platforms with Tamiya "Super Thin" cement and set these parts aside.

Cut the Slope Sheets from the sprues.  You may want to open up the slots on the bottom of the end plates to make it easier to slide the Underframe in place later on in the assembly process.  You may also want to run a file down each side.  Install the Triple Valve and Air Resevoir on to the Slope Sheets.  I sanded the mounting pins to make installation easier and then cemented the Bake Lever into the mounting hole on the Slope Sheet.  Then I mounted the End Braces to the bottom of the Slope Sheet.  The instructions that come with the kit have a great diagram for the installation of these parts.  You can test fit the Slope Sheets into the body at this point.

The ACC holding on the wight should now be cured.  Turn over the under frame and glue the Center Sill sections in place.  Then screw the Bolster Plate in place making sure that it sits level on the Underframe.  Then glue it in place.  I left the screws in place until it was time to attach the trucks.  I glued the Outlet Plates in place at this point but again, they are fragile and you may want to hold off on these until the car is being weathered.  You can install the couples now if you want.  YOU WILL HAVE TO SCRAPE AND OR FILE THE INSIDE OF THE COUPLER BOXES TO MAKE THEM FIT ON THE UNDERFRAME.

Note that I haven't mentioned the Roof  Hatches.   You can attach them now, but if you plan to weather the car, DO NOT GLUE THEM IN PLACE.  At this point, drop the Underframe in place and attach the End Frames.  These parts fit perfectly in place on my models.  I glued these parts in place but on future models I will not.  I think weathering will be much easier if these parts can be removed.  Since all my cars are going to be weathered, I left off the trucks.


Weathering

 
Up to this point, I had never weathered a freight car using tube acrylics and oils.  I had only used an airbrush and powdered pigments or chalks.   I spent hours on You Tube studying weathering techniques and came away convinced that acrylics and oils were the best way to achieve realistic effects.  I made two trips to my local art supply store before I came up with everything I needed.  In addition to what is shown in photo, I purchased a couple of cans of Dullcoat and Q-tips.  Colors include Burnt Sienna, Raw Sienna, Burnt Umber, Raw Umber, Titanium White and Black in both oil and acrylics (I need to go back to the art store for some yellow and stop by a drug store for a soft make-up brush).  You will also need a couple of "donor" cars to experiment on.


Most of the cars I saw in phosphate service were lessors.  I had a stash of 4 CSX 4750's along with an assortment of gray cars with various road names.  I started by removing most of the road names off the assorted cars with 400 and 600 grit sandpaper.  I left the data in place.  Since these cars were going to get moderate to heavy weathering, I didn't get all the lettering off.  I also took off some of the paint exposing some raw plastic.  I left one of  CSX cars in factory lettering but removed the "CSX Transportation" logo from the other three.


My initial test car was an Erie Lackawanna car.  The first step for all of these cars was "fading" the factory paint jobs.  All of the cars were sprayed with Dullcoat followed by a wash of Titanium White Acrylic; about one part acrylic and 10 parts water but this ratio varied from car to car.  A soft flat brush was used.  Always finish up with vertical brush strokes The acrylic was allowed to dry and then over sprayed with Dullcoat.


Deemed a success, I went on to "fade" another 10 cars including a couple of Atlas cement cars I picked up cheap on ebay.  The car on the top has the fade coat applied, lower car has not.  After studying more pictures, I have since given this car 2 more fade coats.


Next up is the grime coat using the oils.  I made a mix of brown and black to come up with the color.  Thinned and applied in the same matter as the "fade" coat, the oils work better because they don't dry as fast and they are easier to manipulate.  You can add or remove paint to get the effect you want.  Since the ribs on 4750's tend to weather less than the rest of the car side, you will want to remove most of the paint from the ribs with a Q-tip moistened with Odorless Turpenoid or similar product.  You can also use a dampened Q-tip to remove some of the grime between the ribs and lighten some of the side panels.  As mentioned in the fading stage, always finish up with vertical brush strokes

Here is CSX #251317 with a single "grime" layer.  Note that the ribs are relatively clean compared to the rest of the car.  It has also been renumbered with decals provided by Accurail and the large "CSX Transportation" logo has been removed.  This is a ex Seaboard Coastline/Family Lines car so the paint would be relatively fresh in 1990.  I swapped the roof hatches around between different cars.  The roof hatches don't show up very well in this photo, but they are a slightly different color with one recent replacement painted white.  This car is currently in service on the layout.


The next car received a 2nd coat of grime. more black than brown, and another coat of Dullcoat.  It's the only car that I left with the "CSX Transportation" in place.  A factory fresh CSX car is sitting on the upper box for comparison.


Now, I know you are wondering what happened to the initial EL sacrificial lamb.  Well here it is.  I tried adding the rust with acrylics with mixed results.  I think the technique is sound but on the next car, I will try using oils. I painted the roof with a full strength rust colored acrylics, making sure to get the paint under the roof walk.  Then I dry brushed the rust color down the sides.  I used a sponge brush on the walk ways.  One of hatches was painted white and then the hatches were installed on the car.  The different hatches show up better in these two photographs.  Not sure if this car will ever make it onto the layout. I don't like the way the ends or the underframe turned out.  At this point, I think a airbrush is better suited for adding heavy grime and weathering to the bottom and ends.  Maybe I will try and over spray the ends and underframe with a light coat of grime to even things out.


And a couple of photos until next time when I will share more photos of my adventure in weathering Accurail covered hoppers.  Empty phosphate cars headed back to the Bone Valley in Florida. 


Finally, my second knee replacement is progressing.  I am off the pain killers and I am no longer using a walker or a cane around the house.  I should be able to get out to the train room in a week or two.  I have gathered up all the materials to scenic the area shown in the above photos and the river crossing.  I am looking forward to having a finished scene to photograph my models.


:

Sunday, October 18, 2020

Construction Update #13 - Lower Staging Yard & SK Transfer

The Lower Staging Yard & The South Kentucky Transfer (Pre 2nd Knee Replacement)


With the upper level staging tracks and reverse loop installed, wired, and tested, it was time to finish off the lower staging yard and the South Kentucky Transfer at Smith Grove.  At this point, it is important to note that my original plan for a hidden lower level staging yard built on a removable section across an 8' gap in front of the garage door was not going to work for a couple of reasons; the main one being expansion and contraction and the other being the number of tracks involved.  As a result, I built my standard L-Girder covered by 3" of pink foam bench work across the opening.


Here's what the area looked like after the back drop was installed,  The South Kentucky Transfer at Smith Grove will be in the left foreground.  The lead for the South Kentucky Transfer is in the center foreground, the ladder for the staging will be directly behind the lead. And, the old L&N crossing/interlocking is on the right.  The lower level staging passes through the wall on the left and into the dispatchers office directly below the upper level staging yard.
. 

The South Kentucky Transfer consists of three tracks.  The code 70 Micro Engineering flex is glued to N-Scale cork.  The area in between the tracks is filled in with O-Scale cork.  There is a fourth track about 2" from the back drop that will service Pace Chemicals and Bowling Green Metal Works.  Pace Chemicals replaced Trace Diecast.  Eventually most of this area will be covered with styrene, painted, and scribed to represent a large concrete pad.  These tracks can easily handle 10-15 in bounds a day putting additional stress on Preston Miller Yard (More on that later).


As I noted in the last update, I have also been setting up the files for the CAROUTE software and running some tests.  It wasn't long before I realized that the yard at Preston Miller couldn't handle the traffic in and out of Bowling Green.  Initially, I transferred some of the work to the small yard at Gemco but the relief was short lived. The addition of the "new" South Kentucky Transfer added another 10-15 cars to the mix.  Over the years, one of my favorite Model Railroader authors has been David Burrows.  On one of  earlier versions of the Cat Mountain & Santa Fe, he came up with the idea of a visible staging yard that he used more like an arrival/departure yard.  I plan to use the Madisonville Staging yard in a similar manner.

This photo illustrates the South Kentucky Transfer lead and run around track.  The five track Madisonville staging yard is on the right. 


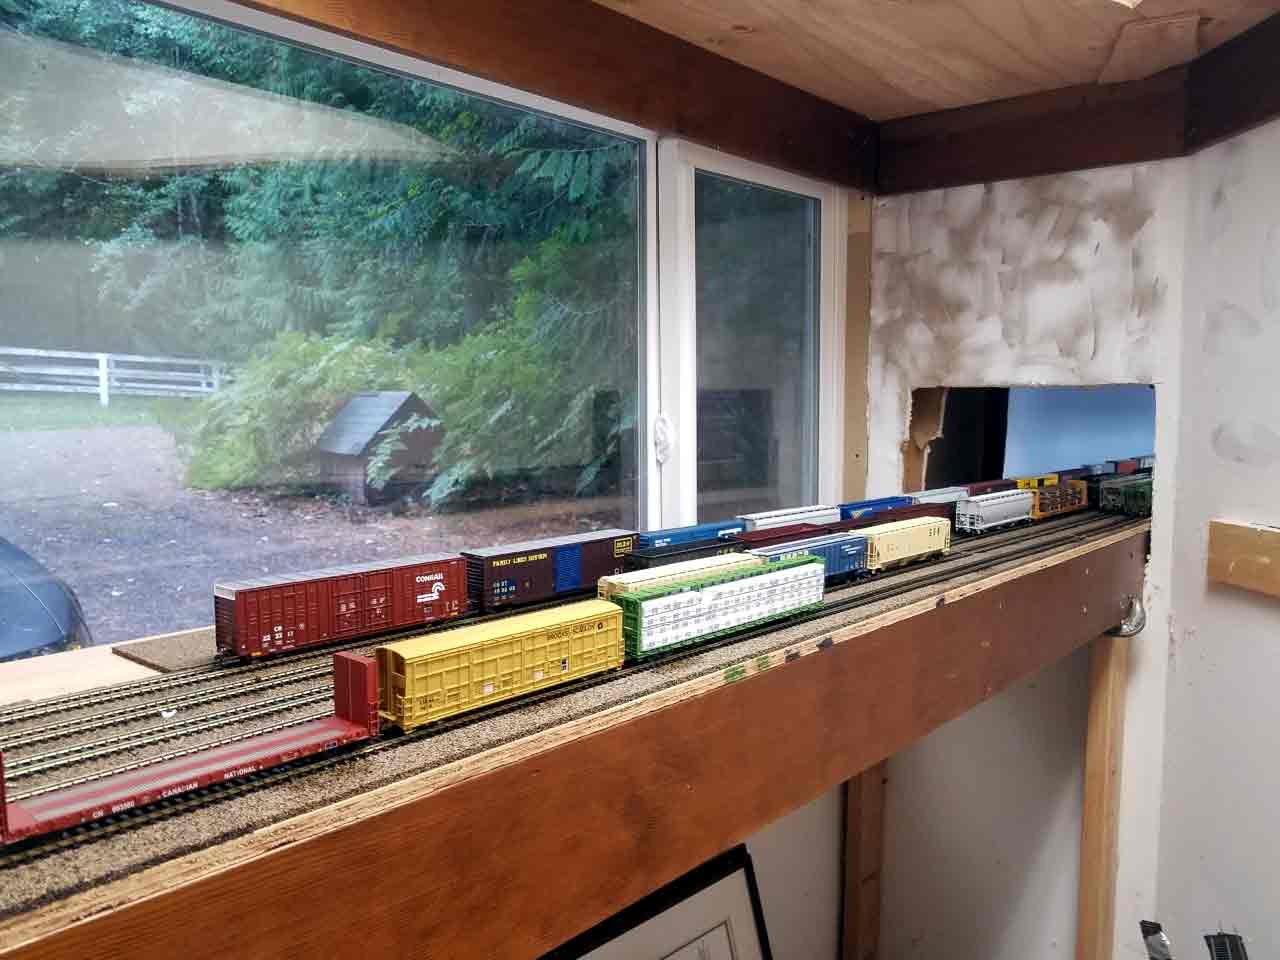
The back side of lower staging yard with the upper level staging and reverse loop above the window.  Eventually I want to put the dispatchers desk and possibly a CTC machine underneath the lower level staging.  Current plans call for most of the lower level to be operated under "yard limit" rules while the helx and upper level, to include the upper level staging, controlled by CTC.  These tracks are capable of holding 18-22 cars each.  There is room for at least 2 additional tracks


Locomotive Updates (Post Knee Replacement)


On Tuesday, the 6th, I had my second knee replacement.  A full recovery takes about 6 months so I won't be spending a lot of time working on the layout.  Instead, I will be working on locomotives, rolling stock and structures.  I can only sit at the desk for an hour or two at a time so I decided to add a couple of NS locomotives for run through service between Preston Miller (Bowling Green) and NS's DeButts Yard in Chattanooga.

First up is Norfolk Southern #3675.  The 3675 is a Atlas Master Series NS B23-7 in factory paint.  These locomotives were set up by Southern to run long hood first.  It got my standard install of a Tsunam2 sound decoder, a TCS Keep-Alive, and Kadee #58 couplers.  In addition it is one of my first locomotives equipped with LED lighting using Evan Designs surface mounted and pre-wired "yellow glow" LED's.  It still needs a second set of horns on the long hood some weathering.


Next up is Norfolk Southern #1388.  Again the 1388 is a Atlas Mater Series NS GP-40 in factory paint.  These locomotives were also set up to run long hood first by the Norfolk & Western.  It got my standard install of a Tsunam2 sound decoder, a TCS Keep-Alive, Kadee #58 couplers. and Evans Designs LED lighting.  It too needs some light weathering. 


Next out will be CSX #2107.  The 2107 is an ex B&O GP-38 that hung around in B&O paint for nearly 10 years following the 1986 merger between the Chessie and the Seaboard System.  I have been purchasing CSX and some NS slides on ebay for about 18 months and to date I have accumulated over 400 photos.  This photo was taken in Brunswick, MD during October of 1989.  The photographer's name is not on the slide so I am unable to credit this very cool photo.  As it turns out, I have 3 different photos of the 2107 in this paint scheme.
 

To facilitate this project, I picked up another Atlas Master Series GP-38 for this project on ebay for around $60.00 including shipping.  I need to pick up some B&O decals and a few detail parts for this model to include that distinctive plow.


Finally, if you would like to be notified when a new post is added, click on the "Follow" button at the top of the page or send me your email address at sdepolo@outlook.com and I will add your address to the list.  If you would like to be taken off the existing list, please let me know that too.


Thursday, August 27, 2020

Construction Update #12 - Operating Software & Upper Staging Yard

Caroute

NOTE:  If you don't have any interest is operations or you are currently using a system with good results you may want to skip down to the layout construction update section below.  If you are considering the use of two sided waybells with four destinations and a car card or another computer program, I suggest you take a look at CAROUTE (www.decapodsystems.com). The program is written in visual basic for Windows based PC's and costs $67.00 plus $3.00 for shipping.  The system works as advertised and the owner of Decapod System, Jim Botsko, provides excellent customer support.  When you need help or have a question, he actually answers the phone and returns emails!

What follows is not a detailed set of "how to" instructions for the installation of the CAROUTE software.  Those instructions are included with the software.  It does however illustrate how one of several available software applications can be implemented on a model railroad. 


Planned Railroad Routing "CAROUTE" from Decapod Systems


CAROUTE is similar, in concept, to the long standing two sided, four destination, waybill and car card system used by many modelers.  As a result, this section may be useful to those who are planning to use that system.  CAROUTE does however offers several advantages over the two sided, four destination waybill and car card system and in my opinion is a preferable solution.

  1. CAROUTE is fully automated and easily edited.
  2. CAROUTE generates a customizable switch lists for each train.  There are no cumbersome waybills and car card to deal with.
  3. CAROUTE will also generate a switch list for one or more industries/yards
  4. CAROUTE allows for up to 20 different destinations on a single waybill.
  5. CAROUTE automatically assigns each car to the appropriate train.
  6. CAROUTE includes a data analyzer and several other tools to fine tune the program.
  7. Your operators won't take home a pile of car cards by mistake when the operating session is over. (I did that once)
CAROUTE requires four different data files in order to generate a switch list.  For a large railroad like mine, this requires a significant amount of time.  I suggest building the files in the following sequence.
  1. Town File
  2. Industry File
  3. Car File
  4. Train File 
Once these are set up, they can be added to the Main Menu/Setup File.  The Setup file will automatically load the four data files each time you start the program.  The set up file also incudes links the data file editor, a switch list generator, and a data analyzer.
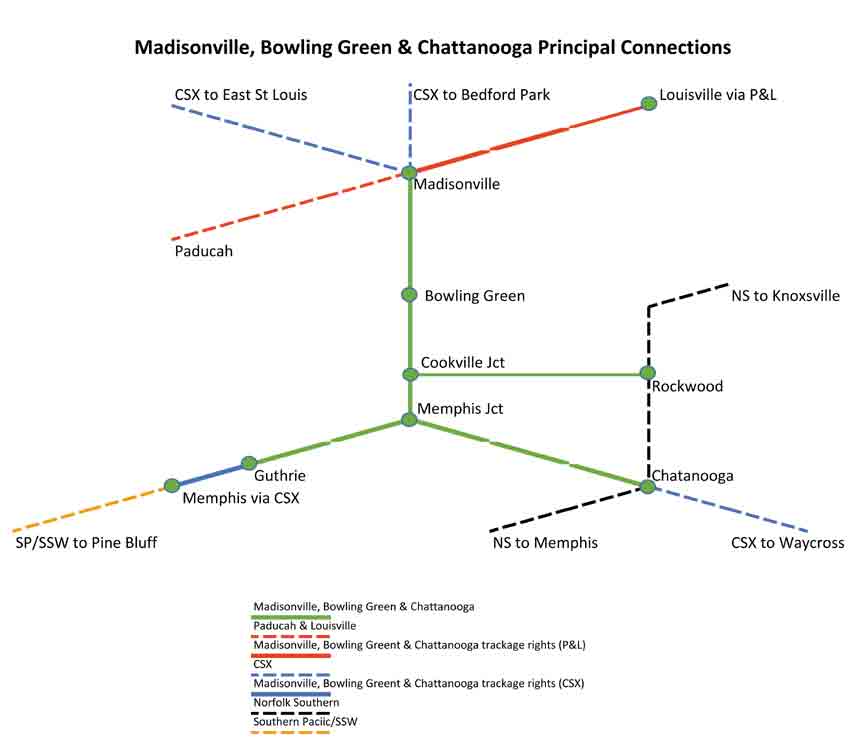
In order to load the data files, some preliminary work will make the process easier.  I started with a operational schematic based upon my track plan:


At this point, it should be noted that I only model the portion of the railroad from a point west of Bowling Green to just beyond Cookeville Junction to include a short section of the line to Rockwood.  The rest of the MBG&C is represented by staging,  In the diagram above, the MBG&C is shown by a solid green lines with trackage rights to Louisville over the Paducah & Louisville between Madisonville and Louisville (solid red line) and trackage rights to Memphis over the CSX between Guthrie and Memphis (solid blue line)

The MBG&C, much like the present day Montana Rail Link, is dependent upon overhead traffic.  In the Montana Rail Link's case it's the BNSF providing the overhead traffic. With the MBG&C it's CSX.  As a result, lots of CSX power and equipment are present.  3 trains a day, in each direction, represent this business; one in each direction between Louisville and Memphis and two in each direction between Madisonville and Chattanooga.  With the exception of auto parts for the GM assembly plant at Plum Springs and TOFC for the South Kentucky pig ramp in Smith Grove, these trains are limited to swapping blocks as necessary at Preston Miller Yard in Bowling Green.

Two other trains work the entire length of the line.  There is a general merchandise freight in each direction between Madisonville and Chattanooga and a long distance local/turn between Madisonville and Rockwood.  In addition there are three locals and a yard job centered around Bowling Green.  These trains will be expanded upon in the "Train File" section.


The Town File


The Town File is the simplist of the four files.  While the MBG&C is a north/south operation the CAROUTE software is set up for east to west,  The towns in staging are highlighted in red. They are listed east to west and are entered into the Town File in the same order.

  1. Chattanooga (CSX/NS Interchange)
  2. Crockett
  3. Memphis (SP/SSW Interchange
  4. Memphis Jct
  5. Rockwood (NS Interchange)
  6. Cookeville
  7. Grundy
  8. Coalmont
  9. Westmoreland
  10. State Line
  11. Preston Miller (Bowling Green Yard)
  12. Bowling Green
  13. West Bowling Green
  14. Smith Grove (South Kentucky/Bowling Green TOFC Ramp)
  15. Plum Springs (Bowling Green GM Assembly Plant)
  16. Madisonville (CSX/Paducah & Louisville Interchange)
Here is a sample of the data imput screen for the Town File.  Data entry points, for all four files, are alway shown in white and in all but one case should never be left blank. There are only two significant data points on this form; the name of the "Town" and the "Print code".  The print code is only useful if you want to print a switch list for all trains servicing the industries in that town.  If you want the switch list you would enter a 1 in the "Print Code" box and list the train numbers in the column on the right.  These can be added after the Train File is created.  All of the fields can be edited at a later date.  This process is outlined in the CAROUTE system manual.


Always save the file before returning to the Main Menu.


The Industry File


The Industry File is next.  Industries are always a subset of a town; they can be listed as a industry name, spur, yard, interchange, destination, or anything else for that matter.  The program logic uses the number associated with a industry, not the name.  The same is true for Towns, Cars and Trains.  I made a list of all my industries, again from east to west before I started my data entry.  I'm not going to list my entire Industry File but here is a sample for Chattanooga:

1. Chattanooga (Staging)
  1. NS De Butts Yard
  2. CSX Waycross/Jacsonville
  3. CSX Waycross/Tampa
  4. CSX Atlanta Montgomery
All the industries (interchanges) could be combined but that would require a lot of shuffling around of cars in staging between operating sessions.  The program always assigns cars to the first available train that serves a destination/industry so it may route a car into staging on one train and out on another.  I didn't want that, especially on the upper level 80" above the floor.  Using the 4 different industries (interchanges) insure that trains always come out of staging the same way they went in and any block swapping is done at Preston Miller Yard in Bowling Green.

Here is a sample of the data imput screen for the Industry File.


Note:  A situation may occur where the program will try a send a car to a industry that is already full.  In that case, the program will route the car to the nearest industry with Yard code 1.  On my railroad, the various tracks in Preston Miller Yard are the only industries that have the Yard Code 1. The Industry Files for the town of Preston Miller Yard include the following:
  1. Local
  2. East Bound
  3. East Bound Shorts
  4. West Bound
  5. West Bound Shorts
During the next operating session, the program will make another attempt to ship the car to the original destination.  If this happens repeatably, then the industry capacity is to small or there are to many cars on the layout with that destination.

The town of Preston Miller Yard should also be given the Print Code 1.  Then when the program generates switch lists, it will include one for Preston Miller Yard.  The resulting switch list can be used by the Preston Miller yard crew or yardmaster to help expedite the flow of cars in and out of the yard.  The Car File sample in the next sections includes routing through the town of Preston Miller Yard.

Always save the file before returning to the Main Menu.


The Car File


Here is where things get really interesting.  In order to facilitate this process, I took every piece of rolling stock off the layout and built the Car File car by car, industry by industry.  Each time I added a car to the Car File, it was placed on the layout at the appropriate location.   On my railroad, it  generally takes 4 cars to service a single spot industry during every operating session.  For example, Graham Packing in Bowling Green receives raw materials in 50' XM boxcars.  RBOX 10824 is one of 4 cars assigned and its waybill includes the following destinations:
  1. Graham Packaging
  2. Preston Miller Yard-East Bound
  3. CSX Atlanta/Montgomery
  4. Preston Miller Yard-Local
When I was setting up the layout, I placed RBOX 10824 on the inbound local track in Preston Miller Yard; industry 19, waybill Step 4.  During the next operating session, RBOX 10824 will be forwarded to Graham Packaging (Industry 33).  Additional destinations for ROBS 10824, up to 20, can be added at any time.  Destinations can also be edited or deleted at any time.  The Load Status is the status of the car entering the destination for that step of the waybill, 1 for load, 0 for empty.  Based upon this file, ROBX 1824 will arrive, loaded, at Graham Packaging every 4th operating session.

Here is an sample for the data input screen for the Car File


Always save the file before returning to the Main Menu.


The Train File


I find that developing the train files is more fun than work and a lot of different combinations can get the job done.  In fact, you can develop more that one Train File and change things up from time to time.  Again, the files are easily edited and the system will let you know if a car can't be moved because there isn't a train assigned to switch a particular industry.  Here is an example of the data input file for the Smith Grove Local.  The Smith Grove Local switches all the industries west of Bowling Green.  Note that the train originates and terminates at Gemco Yard.


Power assigned to the Smith Grove Local lays over at the Gemco Yard Office.


The case for Train Symbols


The MBG&C uses alpha numeric train symbols.  I think train symbols are one aspect of operations that many models discount or don't use at all.  Symbols give substance and depth to a train and a sense of reality to the layout.  They tell where the train came from, where it is going, it's purpose, and how it should be handled.   The trains symbols used on the MBG&C are based upon those used by the Southern Pacific prior to 1985.  The first group of two letters is the origin and the second group of two letters is the destination.  The last letter is the type of train.  For example the Memphis to Louisville SP run through carry's the symbol MFLOP (Memphis to Louisville Perishables).  The symbol tells us something about the train.  The MFLOP is a high priority freight with a block of reefers (Colton Block) coming out of California on SP's LAMFT.   The train will probably have big burly SP Tunnel Motors up front that will have to be swapped out for a brace of Paducah & Louisville GP-10's at Preston Miller Yard in Bowling Green.

The "Colton Block" passing through Bowling Green on the MFLOP (Memphis to Louisville Perishables).


My friend, Kurt Boyd, gave me theses "Blue Box" Athearn kits.  I assembled and weathered them in one evening and had them on the layout the next morning. Intermountain wheel sets, Kade #58 Couplers, an extra once of weight, and some weathering turned these inexpensive kits into perfectly good, in my opinion, layout quality models.

So now, if you see a couple of SP tunnel motors up front followed by a block of 57' PFE/SPFE reefers making track speed on the MBG&C, you'll know it's the "hot" MFLOP.  If you're the Preston Miller Yardmaster, you won't want to risk the wrath of the Terminal Superintendent by delaying the MFLOP.  And, if you are the crew assigned to the MFLOP you won't waist the dispatcher's time by asking to hold at Coalmont so you can scurry over to the mine's company store for a cup of coffee or a ice cold Mountain Dew.


Train types on the MBG&C

A    Auto Parts
K    Chemical
D    Drag
F    Forwarder
J    Juice Concentrate
L    Local
P    Perishable
T    Trailers/Containers (TOFC)
Y    General Merchandise

Origins/Destinations


BG   Bowling Green, KY
BE    Bedford Park, IL (CSX)
CH   Chattanooga, TN (CSX, NS)
ES    East St Louis, IL (CSX)
JA    Jacksonville, FL (CSX)
LO    Louisville, KY (CSX)
MA    Madisonville, KY (CSX, P&L)
MF    Memphis, TN (SP)
PB    Pine Bluff, AR (SP)
PS    Plum Springs, KY
RO   Rockwood, KY (NS)
TA    Tampa, FL (CSX)
WA   Waycross, GA


Switch Lists


So....  Now that all the work is done its time to print out the switchlists; go to the main menu and press SWITCH LIST and then press MAKE SWITCH LIST,   The program will ask you for a date or ID number for the switch list and then press OK.  At this point you have three options:
  1. Preview Switch Lists 
  2. Print Switch Lists
  3. Output Switch List to File
Since I like to simplify and add  "Special Instructions" to my switch lists I normally preview and then output the Switch List to a file.  Then I load that file into Word, make any changes, and print out the switch list.  You can also print out the Beginning Status (car locations), the Final Status and errors and warnings. Once you are satisfied, you can press Return and then Update Files and you will be ready for the next operating system.  If you press Continue instead of Update Files, you will be taken back to the main menu and the system will not be updated.

Finally, creating the switch lists requires a complex inter-related set of data to work properly.  This generally means your data will require some fine tuning after the initial data entry.  I'm not done fine tuning my switch lists so a sample will have to wait for a future update.


CAROUTE can handle up to a 200 towns, 300 industries, 100 trains, and 1500 cars.  You might want to give it a try.


Finishing off the Upper Level Staging Yard


The track and wiring on the main part of the layout is all down and tested at this point.  As a result I am just finishing the upper staging yard and have started the bench work for the lower level. Originally, I planned to have the lower level staging yard on a swing gate in front of the garage door.  A couple of weeks ago, I changed my mind.  I concluded that keeping 6 tracks in alignment over a wide range of temperatures and changes in humidity probably wouldn't work.  Eventually Smith Grove will be located were the red toolbox is sitting.  The South Kentucky TOFC ramp and bulk transfer facility will be located in Smith Grove along with Bowling Green Metal Fabricators.  Trace Diecast was also supposed to be in Smith Grove but I have decided to replace it with Univar Solutions, a chemical ingrediant and solutions provider (tank cars).


Here is the entrance to the upper staging yard.  The far track, next to the backdrop, is the eastbound main.  The track in the foreground is the westbound main.  There are four double ended yard tracks inbetween the two mains.  If you include the east and westbound tracks for staging purposes, there are five tracks capable of holding at least three six axle diesels, 20+ cars and a caboose.  There is one shorter track capable of holding two six axle diesels, 14 cars and a caboose.  The turnouts are controlled by Tortoise switch machines.  At some point, I would like them to be dispatcher controlled.  In the meantime, they will be controlled by a small panel at Crockett.


The six tracks run down the west wall of the room and duck into the dispatchers office through a hole in the wall.  The track here is Peco Code 83.


A view from the dispatcher side.  Here, the eastbound main is on the far left.  It loops around the dispatchers office and becomes the west bound main as it ducks back through the hole in the wall..  The radius around the loop is 34"


And finally, here is a view of the dispatchers office from just outside the door.  The bench work for the lower level stub in staging yard is in front of the window.  A couple of the lower level staging yard will duck through the near wall, to the left of the doorway, and continue another 6 feet above my work desk.


Roster Additions


Two additional locomotives have been added to the fleet.  Both were purchased with pre-installed Tsunami2 decoders; both have working rooftop beacons. some light weathering (MIG Panel Line Wash) and came equipped with Kadee couplers.  All I did was install a TCS KA2 Keep Alive and reprogram the speed curve, momentum, and volume.  Both are Master Series Atlas GP-38's.  These are the first two locomotives on the layout in the Y2 paint scheme.


Finally, if you would like to be notified when a new post is added, click on the "Follow" button at the top of the page or send me your email address at sdepolo@outlook.com and I will add your address to the list.  If you would like to be taken off the existing list, please let me know that too.